Welcome to our guide on Kubernetes best practices. Whether you are a seasoned Kubernetes user or just getting started, these tips and examples will help you optimize your Kubernetes deployments, boost efficiency, and ensure the reliability of your applications.
Building Small Containers
The way to deploy Kubernetes applications is to put the application in a container.
Using the default base image can cause a large image and a lot of security vulnerabilities.
Most Docker default images use Debian or Ubuntu as the base image, and these base images can add hundreds of MB of overhead, and all that overhead can be a great hiding place for vulnerabilities and bugs.
There are two ways to reduce image sizes.
- Small Base Images
- Builder Pattern
Using small base images (alpine versions) is probably the easiest way to reduce the image size.
If the language your application uses doesn’t have a small base image option, you can build the image using the “raw linux alpine” image as a base, this way you have complete control over what goes into the container.
In interpreted languages, the source code goes directly to the interpreter and is executed, but in compiled languages, the code is pre-compiled and this compilation step requires some tools that we don’t need to run the code, which means that you don’t have to put these tools in the final container, and the “builder pattern” is used to do this. The main purpose is that the code is built in the first container and then the built, that is, compiled code is added to the final container, so that the compiler and other tools in the compile process are not added to the final container, so that the size of the container does not grow unnecessarily.In the Dockerfile where we apply the builder pattern, there are 2 “FROM” statements and these statements are given alias as “as or AS”.
FROM golang:alpine AS build
.
.
.
FROM alpine
COPY --from=build ...
There are two areas where small base images and the builder pattern have measurable advantages.
- Security
- Performance
If we look at the “Performance” side, the time to build, pull and push the images will be much less. Although the build and push times of the images are not very important, the pull time is very important because in such a scenario, a down node in the cluster has to pull all the images again and the shorter this time is, the sooner the node will recover itself.
If we look at the “Security” side, smaller images will be more secure against attacks since they have a smaller surface.
Organizing Kubernetes with Namespaces
For example, teams cannot create deployments or services with the same name, if you have thousands of pods it can take a long time to list them.
Namespaces are used to simplify these situations.
You can think of a namespace as a virtual cluster in a k8s cluster.
You can have namespaces within a single k8s cluster and they are completely isolated from each other, which helps you with security and performance.
k8s comes with basically 3 namespaces. default, kube-system and kube-public.
kube-system and kube-public usually host Kubernetes related workloads (pods) so the only place for our workloads is “default”.
- kubectl create namespace test
- kubectl get namespaces
- kubectl apply -f test.yaml – namespace=test
normally all kubectl commands run in the current active namespace (if no namespace is specified, this is “default”).
Normally, if your application wants to access a Kubernetes service, it can use the structurally supported “DNS Service Discovery” and access the application with this service name. But there may be applications with the same service name in different namespaces, we can solve this with “Expanded DNS Address” (Cross Namespace Communication) <service name>.<namespace name>.svc.cluster.local in the form, also called common DNS pattern.
Kubernetes Health Checks with Readiness and Livenes Probes
Health checks allow the system to understand whether the application is running or not.
If your application is not running, other services should not be able to access it and forward requests, instead requests should be forwarded to other healthy instances of the application, and the system should be able to make the application healthy again.
By default k8s starts sending traffic to the pod when all containers in the pod are running and restarts when containers crash.
You can make your deployments more robust with custom health checks.
There are two types of health-checks in k8s.
Readiness
- informs k8s when the application is ready to receive traffic.
- k8s makes sure that the pod has successfully passed the “Readiness Probe” before it starts transmitting traffic.
- If the “Readiness Probe” fails, k8s stops sending traffic to the application until the relevant health-check is successful again.
Liveness
- informs k8s if the app is alive or not.
- If your application is unhealthy, k8s deletes the pod and starts a new one instead.
Now it’s time for the probes to test these health checks, there are 3 types of probes.
1) “HTTP”
livenessProbe:
 httpGet:
 path: /healthz
 port: 8080
2) “command”
livenessProbe:
 exec:
 command:
 — myprogram
3) “TCP”
livenessProbe:
 tcpSocket:
 port: 8080
Probes can be configured.
- initialDelaySeconds: after how much time these health checks will start to be tested.
- periodSeconds: how long intervals these requests will be sent for testing.
- timeoutSeconds: how long to wait for the response.
- successThreshold: how many successful requests will be considered successful.
- failureThreshold: after how many failed requests will it be considered a failure.
Setting Resource Requests and Limits in Kubernetes
Containers need to be given enough resources for applications to run, if you try to run a large application with small resources you can get out of memory errors.
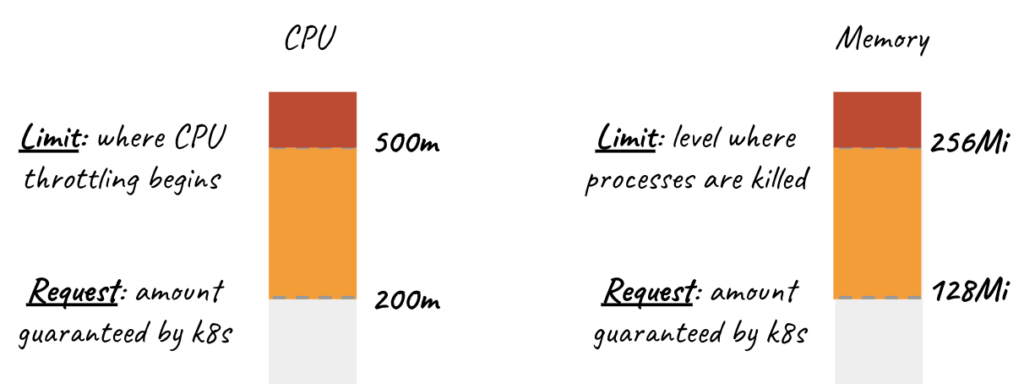
Requests and Limits are the mechanisms used to control resources such as CPU and memory.
Requests is the definition where containers are guaranteed to get the relevant resource. If a container requests a resource, k8s schedules it on the node giving it the requested resource.
Limit is the value that a container can never exceed.
There are 2 types of resources.
- “CPU” and “Memory”.
If the “requested” resources are greater than the total resources of the owned node or nodes, the pod will never be scheduled.
resources:
  requests:
    memory: "64Mi"
    cpu: "250m"
  limits:
    memory: "128Mi"
    cpu: "500m"
All containers in the pod can set their own requests and limits.
CPU resources are defined in millicores. If the container needs 2 full cores to run, you must set this value to “2000m”.
“2 core == 2000m”
If you need 1/4 of the core, then you should set this value as “250m”.
Memory resources are defined in bytes.
CPU is known to be a compressible resource, so when your application reaches these CPU limits, k8s will start throttling the application’s CPU usage so that the application will only degrade in performance and the application will not be terminated, but since Memory is not a compressible resource, the application will be terminated when it reaches or exceeds the given limit.
ResourceQuota and LimitRange are used for similar tasks.
ResoureQuota is actually a definition of resource limitation based on namespace.
kind: ResourceQuota
metadata:
 name: demo
spec:
 hard:
   requests.cpu: 500m
   requests.memory: 100Mib
   limits.cpu: 700m
   limits.memory: 500Mib
In fact, all these values are the max resource values that containers of all pods defined under the namespace can have and max resource values that containers can request.
LimitRange determines the max and min request/limit resource values of individual containers in the namespace, i.e. you cannot request less than this value or you cannot request more than this value.
kind: LimitRange
metadata:
 name: limit-mem-cpu-per-container
spec:
 limits:
 — max: → max cpu and memory limit
   cpu: “800m”
   memory: “1Gi”
   min: → min cpu and memory limit
   cpu: “100m”
   memory: “99Mi”
 default: → default limits
   cpu: “700m”
   memory: “900Mi”
 defaultRequest: → default request
   cpu: “110m”
   memory: “111Mi”
 type: Container
All these requests and limits are actually used by the scheduler to schedule a pod to a node, the scheduler actually looks for a node to run the pod using round robin load balancing and checks if the node has enough resources as requested by the pod, if no node has enough resources the pod waits in “Pending State”.
Terminating with Grace
Our applications should handle the SIGTERM message and start the shutdown process when they see this message.
Kubernetes Termination Lifecycle
Let’s say we want to terminate a pod, at which point the pod will stop receiving traffic.
For a pod in the terminating state
“preStop” hook is executed, SIGTERM signal is sent to the pod.
terminationGracePeriodSeconds: 60 → this happens in parallel with other operations.so it does not wait for the preStop hook or sigterm signal to end.if the application is still not closed after all these operations, the SIGKILL signal is sent and force kill is forced.
Mapping External Services
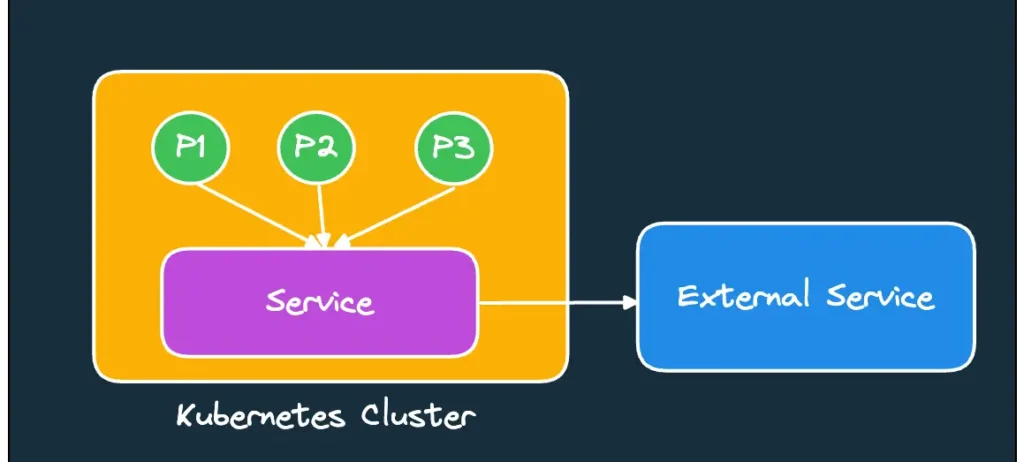
You can also create service and endpoint to access external servers. You have to define the IP of this external server in the endpoint.
For example, let’s have a MongoDB server externally. Let its IP be 10.0.0.124.
First we create a service.
kind: Service
metadata:
 name: demo
spec:
 type: ClusterIP
 ports:
 — port: 27017
 targetPort:27017
As can be seen, there is no pod selector here, so how will the service know where to direct the traffic? At this point, we manually create an Endpoint.
kind: Endpoints
metadata:
 name: mongo
subsets:
 — addresses:
 — ip: 10.0.0.124
ports:
— port: 27017
or there is a structure called external services using domain name, in this case “ExternalName” is used as service type.
Node Updating process
kubectl drain <node_name> -force → delete all pods on the node.
kubectl cordon <node_name> → remove the node from management, so pods are no longer deployed on this node.
PS: After the first operation, that is, after deleting all pods on the node, it is useful to unmanage the node after making sure that these pods are scheduled on other nodes.
Find out about Kubernetes Backup Best Practices: https://devopstipstricks.com/kubernetes-backup-essentials-best-practices-and-examples/