When working with RabbitMQ or other message brokers like it, we want to ensure that messages are successfully delivered, that the message is deleted from the relevant resource (queue, topic, etc.) after processing, or that the message is processed correctly. This brings with it the responsibility of message management. In this article, we will learn about Dead Letter Exchange (DLX) in RabbitMQ, which allows us to take action for the data on the queue when the messages cannot be processed, the TTL on the queue has expired, or the queue has reached a certain limit and cannot receive the message.
What is RabbitMQ?
RabbitMQ is an open source message broker written in Erlang language that enables communication between applications. The source code is available on GitHub.
What is Message Broker?
Message Broker, on the IBM page:
A message broker is software that enables applications, systems, and services to communicate with each other and exchange information. The message broker does this by translating messages between formal messaging protocols. This allows interdependent services to “talk” with one another directly, even if they were written in different languages or implemented on different platforms.
Explore the most popular Message Broker Applications: https://devopstipstricks.com/the-8-most-popular-message-broker-applications/
What is RabbitMQ Dead Letter Exchange and When is it Used?
RabbitMQ Dead Letter Exchange; When messages cannot be routed to the relevant queue, cannot be processed, or when 3 other situations occur that cause the following message to not be processed
- Expiration of the TTL (Time to Live) value of the message in the queue,
- Message rejected by the consumer
- When the queue reaches the maximum number of messages it can receive
is an exchange type that allows us to receive and reprocess the relevant message.
Below is the architecture of this structure in general terms.
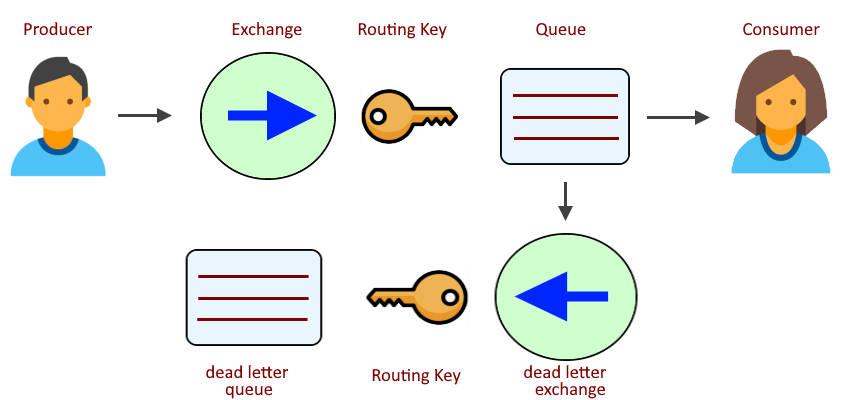
When we examine the statements on the diagram:
- Producer: The application that sends the message to the relevant exchange.
- Exchange: The structure that knows to which queue the message sent by the Producer should be forwarded and forwards it.
- Queue: The area where the message forwarded by the exchange is kept.
- Consumer: The application that receives and processes the message from the relevant queue.
- Dead Letter Exchange: The structure that will forward the rejected message to the relevant queue.
- Dead Letter Queue: The area where the rejected messages will be hosted.
RabbitMQ Dead Letter Exchange with Java
This section will cover the implementation of the theoretical part mentioned above in Java.
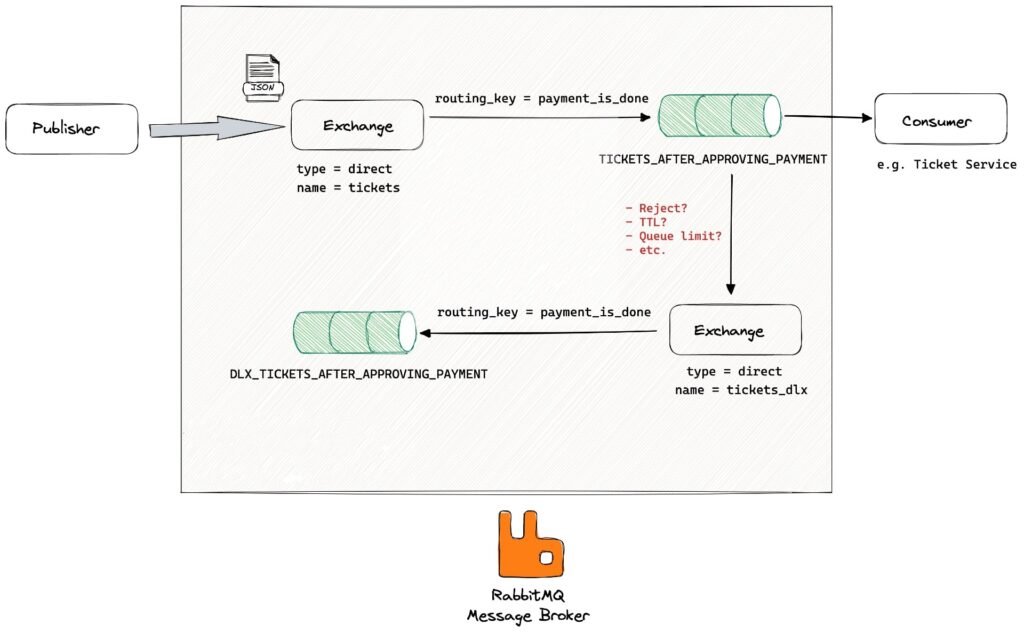
As a scenario, let’s assume that tickets are sold for DevOps events and after the payment process, a message is sent to RabbitMQ and the application will receive this message and perform ticket cutting. The diagram above shows the queue, message, data and exchange expressions that will be used in this scenario.
Due to the criticality of the payment and ticketing operations, there will be some restrictions for the messages on the queue, these are; maximum 10 messages can wait in the queue and the maximum waiting time will be 5 seconds. Messages that do not comply with these rules will go to the relevant queue with the Exchange we will write and will be reprocessed there.
Installation | RabbitMQ Docker
Before moving on to the implementation of Dead Letter Exchange with Java, you can install RabbitMQ with its interface with the Docker Cli command below and do the relevant port forwarding.
docker run -d --hostname my-rabbit --name rabbitmq-dlx -p 15672:15672 -p 5672:5672 rabbitmq:3-managementAfter this process, you can go to http://localhost:15672/ and check the RabbitMQ dashboard and other controls. The username and password required for login here are guest by default.
❯ curl -I 'http://localhost:15672/'
HTTP/1.1 200 OK
content-length: 2884
content-security-policy: script-src 'self' 'unsafe-eval' 'unsafe-inline'; object-src 'self'
content-type: text/html
date: Mon, 25 Apr 2022 07:14:30 GMT
etag: "4229579948"
last-modified: Wed, 18 Aug 2021 13:14:19 GMT
server: Cowboy
vary: origin
After the above definitions are made, RabbitMQ will be ready for use.
Below is the PaymentInfo class that will represent the user and payment information that we will send as a message in RabbitMQ.
class PaymentInfo
{
    private static final Random random = new Random();

    private final Integer userId;
    private final Integer paymentId;

    public PaymentInfo()
    {
        this.userId = Math.abs(random.nextInt());
        this.paymentId = Math.abs(random.nextInt());
    }

    @Override
    public String toString()
    {
        return "PaymentInfo{" +
                "userId=" + userId +
                ", paymentId=" + paymentId +
                '}';
    }
}
In case the message cannot be processed, we pass the exchange and routing key values as parameters to the header when creating the queue. Considering the diagram above, the definitions will be as follows.
// ...

private static final String EXCHANGE_NAME = "tickets";
private static final String EXCHANGE_TYPE = "direct";
private static final String ROUTING_KEY = "payment_is_done";
private static final String QUEUE_NAME = "TICKETS_AFTER_APPROVING_PAYMENT";

private static final String DLX_EXCHANGE_NAME = "tickets_dlx";
private static final String DLX_QUEUE_NAME = "DLX_TICKETS_AFTER_APPROVING_PAYMENT";

private static final boolean DURABLE = true;
private static final boolean EXCLUSIVE = false;
private static final boolean AUTO_DELETE = false;
private static final Map<String, Object> ARGS = new HashMap<>()
{
    {
        put("x-max-length", 10);
        put("x-message-ttl", 5000);
        put("x-dead-letter-exchange", DLX_EXCHANGE_NAME);
        put("x-dead-letter-routing-key", ROUTING_KEY);
    }
};

// ...
Above are the static definitions and the maximum message and TTL to wait in the queue that will go into the header.
// ...

ConnectionFactory factory = new ConnectionFactory();
factory.setHost("localhost");

Connection connection = factory.newConnection();
Channel channel = connection.createChannel();

channel.exchangeDeclare(EXCHANGE_NAME, EXCHANGE_TYPE);
channel.exchangeDeclare(DLX_EXCHANGE_NAME, EXCHANGE_TYPE);

channel.queueDeclare(QUEUE_NAME, DURABLE, EXCLUSIVE, AUTO_DELETE, ARGS);
channel.queueBind(QUEUE_NAME, EXCHANGE_NAME, ROUTING_KEY);

channel.queueDeclare(DLX_QUEUE_NAME, DURABLE, EXCLUSIVE, AUTO_DELETE, null);
channel.queueBind(DLX_QUEUE_NAME, DLX_EXCHANGE_NAME, ROUTING_KEY);

// ...
When we look at the definitions here, 2 queues named TICKETS_AFTER_APPROVING_PAYMENT and DLX_TICKETS_AFTER_APPROVING_PAYMENT were created and connected to the relevant exchanges. In the queue named TICKETS_AFTER_APPROVING_PAYMENT, unlike the other one, DLX information and related constraints were passed as parameters in the header.
After the above definitions, in the code below, there is a publisher that writes 1 record to the queue every second. If the number of records waiting in the queue exceeds the limit, the messages will now go to the queue named DLX_TICKETS_AFTER_APPROVING_PAYMENT and the relevant consumer will start reading the messages from there.
// ...

Consumer<PaymentInfo> publish = (PaymentInfo paymentInfo) ->
{
    try
    {
        System.out.println("It has been sent! PaymentInfo: " + paymentInfo);
        channel.basicPublish(EXCHANGE_NAME, ROUTING_KEY, null,
                paymentInfo.toString().getBytes(StandardCharsets.UTF_8));
    }
    catch (IOException e)
    {
        e.printStackTrace();
    }
};

Runnable messagePublisher = () ->
{
    Executors
            .newScheduledThreadPool(1)
            .scheduleAtFixedRate(() -> publish.accept(new PaymentInfo()), 1L, 1L, TimeUnit.SECONDS);

};

DeliverCallback deliverCallbackDlx = (consumerTag, delivery) -> {
    String routingKey = delivery.getEnvelope().getRoutingKey();
    String message = new String(delivery.getBody(), StandardCharsets.UTF_8);

    System.out.println(" [x] Received WITH DLX! '" + routingKey + "':'" + message + "'");

    channel.basicAck(delivery.getEnvelope().getDeliveryTag(), false);
};

Runnable messageConsumerDlx = () ->
{
    try
    {
        channel.basicConsume(DLX_QUEUE_NAME, false, deliverCallbackDlx, consumerTag -> {
        });
    }
    catch (IOException e)
    {
        e.printStackTrace();
    }
};

messagePublisher.run();
messageConsumerDlx.run();

// ...
When we run the code above, the console output will be as follows:
It has been sent! PaymentInfo: PaymentInfo{userId=76335932, paymentId=1996560747}
It has been sent! PaymentInfo: PaymentInfo{userId=2064688013, paymentId=648854917}
It has been sent! PaymentInfo: PaymentInfo{userId=1169316240, paymentId=474258643}
It has been sent! PaymentInfo: PaymentInfo{userId=1248018143, paymentId=18080868}
It has been sent! PaymentInfo: PaymentInfo{userId=1391253442, paymentId=1825543379}
It has been sent! PaymentInfo: PaymentInfo{userId=1702743921, paymentId=805738981}
[x] Received WITH DLX! 'payment_is_done':'PaymentInfo{userId=76335932, paymentId=1996560747}'
It has been sent! PaymentInfo: PaymentInfo{userId=816735114, paymentId=401707640}
[x] Received WITH DLX! 'payment_is_done':'PaymentInfo{userId=2064688013, paymentId=648854917}'
It has been sent! PaymentInfo: PaymentInfo{userId=2060671911, paymentId=1210826228}
[x] Received WITH DLX! 'payment_is_done':'PaymentInfo{userId=1169316240, paymentId=474258643}'
[x] Received WITH DLX! 'payment_is_done':'PaymentInfo{userId=1248018143, paymentId=18080868}'
It has been sent! PaymentInfo: PaymentInfo{userId=1438400373, paymentId=877235346}
It has been sent! PaymentInfo: PaymentInfo{userId=812357989, paymentId=1097085130}
[x] Received WITH DLX! 'payment_is_done':'PaymentInfo{userId=1391253442, paymentId=1825543379}'
In the article;
- What is RabbitMQ Dead Letter Exchange?
- How to Use RabbitMQ Dead Letter Exchange?
- Using RabbitMQ Dead Letter Exchange with Java
Information was conveyed with the explanation of questions such as questions, other topics and code examples.